Monday, 1 July 2013

How to build a TERRARIUM

Terrariums are such a cool way to to bring plants inside, but also get people who might not be so keen on gardening, doing a little gardening! The terrarium trend is really sweeping florists at the moment, but you could pay a lot for something that is so much fun and so easy to make! They make great gifts and cool weekend projects. So here is my guide on how to make a terrarium!


To create your terrarium masterpiece, you will need:
-a glass bowl or container (can have a lid or be open)
-potting mix
-stones
-sand (if using a closed container)
-moss (can be sheet moss but I used sphagnum moss)
-small plants or succulents
-little plastic toys or decorative things


Having little plants is an important part of growing a terrarium. Plants can be trimmed and pruned while growing, but you don't want to have like a normal sized house plant being crammed into your small terrarium! You should be able to find small plants at your local garden centre or you can use succulents. But collect a variety of different colors and shapes. Having around two or three plants will be the most striking in your terrarium, but if you have a bigger one, then go crazy!


To begin with, make sure your container is clean and dry. You can use a recycled or repurposed container. But ensure it is cleaned with a mild soap and warm water first. Put a small layer of stones at the bottom. This will help with drainage, but also looks really nice. You can use any kind of stones that you like! Then on top of the stones, put your mixture of damp soil and sand (if you are using sand) and pat down gently.
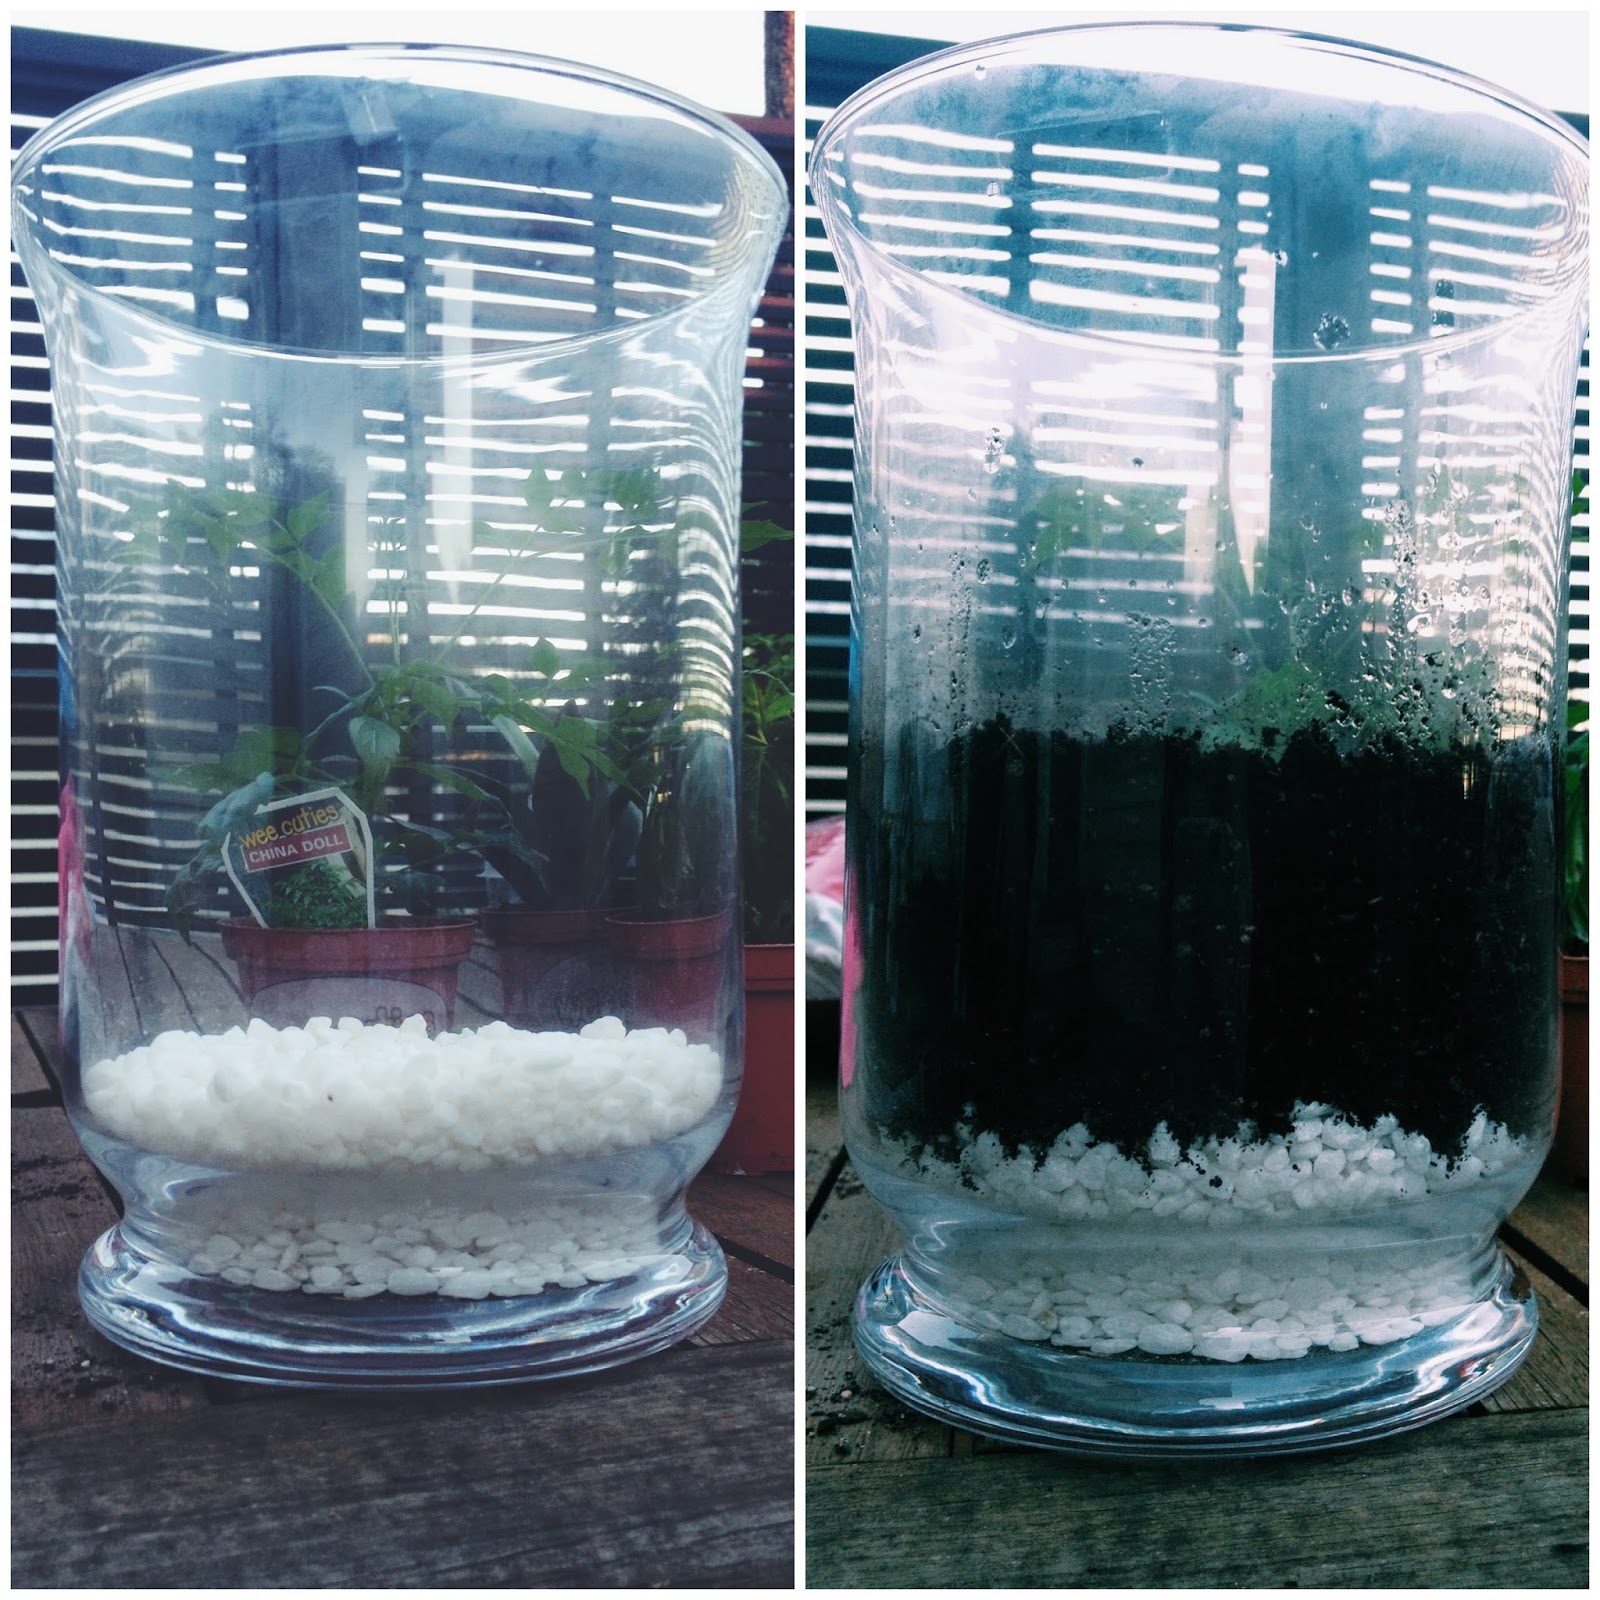
Put the soil in carefully so as to keep the glass clean and not to mess up your pretty stones! Once your soil is in, just like as you do in the big garden create a small hole to put your plants in. Terrariums are about being creative, so just make it look however you want to! Once the plants are in pat the soil down firmly around the plant bases. I found that I needed to add a bit more soil, but you don't need to if you don't think you need to!


Once the your plants are in, put the moss down around the plants. This helps to maintain the moisture in the soil. As your terrarium grows the plants should be misted with water, rather than typical old fashioned water-can watering. If you terrarium has a lid, condensation will form on the sides of the glass. This creates a humid environment for the plants to grow in. If you are using succulents however, you may want to have an open terrarium as the conditions are better when they are open and the plants will have better lives! Sphagnum moss starts out browner when it is bought, but as it is kept moist, it changes to a green color which looks great in the environment.


The final stage of terrarium creation is putting in decorations. This stage can be skipped, but really anything can be put in. Shells, toys, beach glass. Whatever you like! We used dinosaurs, as this is the only way I could convince my husband to mini garden with me!


And voila! Your terrarium is complete! Keep an eye out for yellowing leaves, as this will mean something is wrong in your terrarium environment. If you have a closed terrarium, you won't need to water the plants as frequently, but the terrarium will occasionally need to be aired out. Water plants gently with a mister or spray bottle and enjoy your beautiful creation!


Tuesday, 7 May 2013

Why you should love basil! (and preserving pesto)

I love basil. And I grew a lot of basil over summer. And when I say a lot, I mean I had six huge basil plants growing. I love basil on pizza, in pasta, with sun-dried tomatoes, and I definitely LOVE basil pesto! I love it on crackers, on pasta, with chicken, and in pastry scrolls with cheese. Oh golly. Yes, I love basil.

And you should love basil too. Basil is such a great herb to grow in your garden. Planting it around tomato plants (I did this), called companion planting, helps to give the tomatoes more flavor as they grow. It looks so beautiful as well, if you are planting it in a herb garden, or even in your kitchen garden. Its very simple to grow as well. I bought seedlings and then transferred these to my garden. I dug holes deeper than needed, and then filled these holes with some soil that has special nutrients in it that helps herbs to grow well. I then put the seedling in the hole and covered the roots, and then watered it.

As basil grows, it does have the tendency to grow up rather than fill out, and the ideal basil plant, is not tall with sparing leaves, but rather any height and full of leaves. This can be done by pruning the plant! It sounds scary, and don't stop reading now, cos this is beyond simple. All you need to do to get big, luscious plants is to:

1. Find the main stem of the basil plant (the one that goes down into the ground)
2. Find the spot where there are two smaller branches out of this main stem that are opposite one another
3. Pinch off the stem above these leaves

The two minor branches that you found, will now turn into main stems, and encourage more growth outwards rather than upwards. You can continue to do this as you feel your plant is getting too tall.

At the end of summer, I had a lot of basil that I hadn't used, and I was getting my garden ready for the new seasons planting, I decided to pull the basil out of the garden. I had a lot. And so I knew I wasn't going to be able to eat it all by scattering a few leaves here and then. So pesto was my best option for savoring my basil. And I knew that I would have to preserve some of it, and I don't like the idea of putting it in jars. And then it hit me, I could freeze individual pesto servings!


This actually turned out to be a thing already, and I found that many people had had problems where they were thawing their pesto, and the basil turned brown. The solution: blanch the basil first! Blanching is where you emerge a vegetable into boiling hot water for a short amount of time (in this case, for the basil, like 5 seconds, or until it wilts slightly). I used a sieve to help me do this, because it is only in the water for a short time, it is easier than fishing around with a slotted spoon, but use that if you need to! And very importantly, do it in batches, as this means the cooking is more even! 


After putting it in the boiling water, the basil is quickly transferred to ice cold water. Doing this almost brightens the green color of the basil, and helps to lock it in. I found that it intensified the basil flavor too!


After blanching the basil, I removed it from the ice cold water, and gently patted the leaves dry. I put these in a blender, and then added a little bit of oil. As the blender combined the basil and the oil, I added oil slowly so that it became more of a paste, than slightly oily little basil leaves. This is such a simple recipe, that you don't need measurements. Just add oil, until the pesto looks like it is starting to come along. After I had the right consistency, I poured it (very messily) into ice cube trays and then put these in the freezer.


After spending the night in the freezer I removed the pesto cubes from the ice tray and put them in an air tight container which I keep in the freezer. This is so handy because whenever I need a little bit of pesto, I just take out a cube, and let it thaw. Because it is just basil and oil, you can add your own seasonings depending on what meal you are having. Some delicious flavors to add are garlic or parmesan! Yum yum yum!

I love this pesto with pasta! Its such an easy quick meal! Just cook the pasta, and then drain the water, saving a little of the water. Put the pasta back in the pot, add the pesto cubes, and add a little bit of water, and heat through! Add lots of pepper and lots of parmesan! So good!

Wednesday, 1 May 2013

Capsi-YUM (growing capsicums)

Capsicums are delicious, crispy, juicy, sweet and oh so versatile. You can have them in salads, you can stuff them, roast them, have them on pizza. They add amazing flavor, and texture to whatever dish they are in. And the best part about capsicums, is that they are actually really simple to grow. I used to find the idea of growing capsicums really daunting, but after a long hot summer, I now think they are such an incredible thing to grow! This guide can be used for both capsicums and chillies!


When to grow: Mid spring to mid summer. If you live in a warm area, plant inside in late winter, and then put outside mid spring, and if you live in a cold area, plant inside in late winter or early spring and then don't put outside until after the risk of frost has passed.

Where to grow: Capsicums grow up (to about knee height) rather than out, so you don't need too much space around the plant. They do need a spot that gets a lot of sunlight, but not too much wind. The capsicums are very heavy on the plants and the strong winds can break the plants as they are quite brittle.

How to grow: If you are starting with a seed, plant the seed in good quality soil either inside or outside, depending on your timing, in a seed tray. Make sure you water the seeds really well, and after about 10 days, the seeds will start to sprout. Then move the plants to a small pot about 7cm or 3 inches tall, and keep the plant in this pot until it is about the same height.

If you bought seedlings, or if you planted it from a seed, the steps are the same from here on! Then move the capsicum plant to the garden, or to a big pot if thats where you are wanting to plant it. Plant the capsicum in a good sized hole in the ground. Pat the soil down around the plant base, and then put a bamboo stake into the ground next to the capsicum plant.


Feeding your plants: Capsicums love nourishment! Make sure that you are giving them enough food. Using a liquid compost once every two weeks while the capsicums are growing is really important, as this gives them the nutrients they need to grow well.


Staking the plants: Because of the brittleness of the plants, capsicums need to be staked as they are growing. Putting a bamboo stake in the ground next to the plants is the best idea. The plants can then be tied to the stake using old stockings or something else that will be gentle on the plant. As the capsicum plant keeps growing, keep staking the plant up, so that is secure against the stake.

Important things to know: Good ventilation is important when growing fruits (or capsicums). So ensure that the plants have enough room for air to move freely. Watering the plants really well everyday is also a very important part of growing capsicums.


Harvest: Capsicums can be picked whenever you want to pick them really! The longer they are left on the plant, the more they mature, and the flavor changes. The above, and below capsicum are from the same plant, just the bottom one (reddish) was left on the plant for longer. This is because the plant I grew was a common capsicum. The capsicum starts out green, and ripens to orange or red! Beautiful! When you are ready to pick your capsicums, use scissors to cut the vegetable off, or you can damage the brittle plant!


Enjoy your capsicums, they truly are beautiful plants, and they are so simple to grow! If you have any questions, let me know! (:

Monday, 22 April 2013

WIFE 101: Frozen Cookie Dough Balls

Its official. Your life has just changed. And lets be honest, you're welcome.


Frozen cookie dough balls. Your partner, your children, your friends, and you will all thank, well you.

So to do this, just 
1. Make your favourite cookie dough. 
2. Roll the cookie dough into balls.
3. Line a baking tray with baking paper.
4. Place the dough balls onto the tray.
5. Put in the freezer for two hours (this will stop the dough balls from sticking together into one massive dough ball).
6. Then transfer to a bag or container to keep in the freezer. So simple!

And then when you want to eat the cookies just
1. Preheat the oven to 300 degrees F or 150 degrees C.
2. Line a tray with baking paper.
3. Put the dough balls onto the baking tray with enough room between each cookie for it to spread as it bakes.
4. Put the tray in the oven.
5. After 10 - 15 minutes enjoy freshly baked cookies without any hard work.

You're welcome.

Tuesday, 16 April 2013

WIFE 101: Chores and Blackboards

Sometimes in life you need some friendly competition. I have found this especially to be true when it comes to chores. After a year of asking and then begging for my husband to do some chores (when he does them, he does a good job, he just has other priorities, like TV and 9gag) I think I have discovered a way to get him to do chores without asking!

Yes! Without asking!

All it has taken is a blackboard, some friendly competition and a sweet prize for the winner.

So here is how it works:
-The chores are listed as daily, weekly or monthly chores.
-The daily chores are worth 1 point, the weekly points worth 2, and the monthly worth 3.
-Daily and monthly chores are up for grabs for anyone, but weekly chores are divided equally between us (easier for him).
-Every chore that you do, earns a certain amount of points that you add to your weekly tally.
-At the end of the week, the winner gets a star.
-Then at the end of the month, the person with the most stars wins a prize! This prize could be a box of beer, a manicure, a massage etc. Something that is special that we wouldn't normally do!


And I have put this amazing competition board up on the blackboard painted in our kitchen. Its amazing! The trick to these blackboards is wiping as much dry chalk of as possible, then using vinegar diluted in water to clean the remaining chalk off. Then when it comes to writing on it, wait until the board is completely dry, then using chalk that has been sharpened with a pencil sharpener, and wet with some water, write on the board. The chalk will go on dull, but then dry to be bright and vibrant! Its so much easier to use that way!

So may your house be cleaner and your chalkboards neater.

Iced Green Tea

Everybody loves ice tea. And I especially like it. And here is my recipe for Iced Green Tea made with organic tea! Yum! And so good!!

Iced Green Tea (makes 2L)

Ingredients:
-3/4 cup of sugar (I used brown sugar)
-4 cups of cold water
-4 cups of hot (just boiled) water
-8 organic green tea bags

Method:
1. Put the sugar into a pitcher large enough to hold 2L, and then add in the 4 cups of water.
2. Stir until the sugar is dissolved.


3. Put the 4 cups of hot water into a container (jug or saucepan) and put the tea bags in. Only leave the tea bags to steep for 2 minutes at most.


4. Remove the tea bags from the water and squeeze slightly.
5. Pour the tea into the sugar water slowly and stir to combine.
6. Leave the tea to cool at room temperature and then serve over ice!


7. Enjoy on a beautiful sunny day! YAY!


WIFE 101: How to paint a door

I love my husband. More than anything in the world. But sometimes, you just have to do stuff yourself, because your husband is too busy/you've asked him many times, and its been months. And often times the tasks that we think we can't do, are actually super easy! So here is a Wife 101 (or just independent woman) guide on how to paint a door!

To start with go to the hardware store and choose out some paint samples to take home, also while you are there, purchase a paintbrush that will work best for your door. Using some painters tape, cover up any bits that you don't wanna paint, such as glass or metal embellishments. Before you paint, use a stick of some sort to stir the paint. Then paint some of the different colors of paint onto the door so that you can see what the colors will look like.


After the paint has dried, choose which color is your favorite, and then head back to the hardware store to buy a pot of the paint. Ask the person at the hardware store to make sure that you are buying the right sort of paint for your environment, such as getting a paint that works well outdoors as opposed to an indoor paint etc.

Set up
Before you do anything else, lay down some drop cloths, or old sheets that you can use to catch any paint that falls, or anything else that might damage your floor. 


To begin painting your door, you need to start with essentially a blank canvas, or as close to it as possible. So use sand paper to get as much of the original paint of as possible. This will help your new paint to go on well. Using sand paper roughs up the door a bit as well, but for the best look, try to sand the door in one direction, as opposed to going crazy in all directions, but if you are using a finer sand paper, you can go crazy!


After the door is all sanded down, there is another preparation step. This involves taping up the door, so that you get paint only where you want it. Try to get the paint as close to whatever you are trying to protect, as well as trying to get it as neat as possible, so that you end up with clean lines, and not too much clean up work to do. If you do get paint where you don't want it, you can always use a paint scraper to help tidy it up.


Now that your door is all ready, its time to get the paint all ready. Carefully open the tin up (on your drop cloth) as sometimes paint can go all over the place when you open a tin. Then, using a paint stirrer, or a stick, stir the paint really well. You will notice the color change, and perhaps the consistency. And this is why you need to stir it well!

And begin!
So now you are completely ready to start painting your door. Dip your paint brush in to the paint tin, and then wipe of a little bit of the paint by dragging the brush against the lip of the paint tin. This means that you won't have too much paint on your brush at one time. Then, moving the brush in one direction, begin painting the door. It is important to move the brush in one direction, as this creates the best finish. Get more paint on your brush whenever you need it, and then keep painting the door until it is covered with one even coat.


When painting around the door handles or glass, go nice and slowly, as even though you've used tape to protect these details, some paint could still get on these things!


Apply a second coat!
Once you have done a full coat of paint, wait two hours (or follow the directions on tin), and then apply a second coat. Make sure that all the coats are even and that there are no drips in the paint.


And after the paint has completely dried, carefully remove the tape! And voila! You just painted your first door! The world is now yours! Go and conquer it!